Making Dynamic Contact Form in Personal Portfolio Part-II
Here in this blog I will explain how we can make the previously introduced email notification functionality more reliable. In this part I am going to explain how can we persist the data sent as email notification through asynchronous communication with the database by using SQS.
This integration is divided into two halves. For knowing about the first part go through this link (https://medium.com/@destarxis/making-dynamic-contact-form-in-personal-portfolio-8c8832668e9b)
In the first part we configured a Lambda function to send email notification based upon the contact information provided in the contact form.
Now let us go through the second part;
Step 1
At first we need to create a standard SQS queue. This queue is created to store all the data coming from Contact Form via Lambda trigger (Lambda used for sending email). Message are stored asynchronoulsy in the queue due to which the mail flow of sending email notification is not disrupted.
Here for doing so at first we need to configure some inline policies in Lambda role so that it has privileges to send data to SQS. For this I assigned a inline policy to ContactViaEmail Lambda as;

After configuring permission policies, I then created SQS queue which will store all the data coming from Lambda function.

Note: We need to choose Standard type as queue type while creating a new SQS.
We need to update the existing logic in the Code section of Lambda to store data in the SQS. For this I have created a new file as sqsHelper.mjs which contains the code to store data in the SQS.
Demo Code snippet is shown as;
sqsHelper.mjs
import { SQSClient, SendMessageCommand } from "@aws-sdk/client-sqs";
const sqsClient = new SQSClient({ region: "us-east-1" });

export const sqsHandler = async (event) => {
  let response;

  const params = {
    DelaySeconds: 10,
    MessageBody: event.body,
    QueueUrl: "<Queue URL>"
  };


  try {
    const data = await sqsClient.send(new SendMessageCommand(params));
    if (data) {
      const bodyMessage = 'Message Send to SQS- Here is MessageId: ' +data.MessageId;
      response = {
        statusCode: 200,
        body: JSON.stringify(bodyMessage),
      };
    }else{
      response = {
        statusCode: 500,
        body: JSON.stringify('Some error occured !!')
      };
    }
    return response;
  }
  catch (err) {
    console.log("Error", err);
  }

};
Now we need to import this file in index.mjs so that we can perform the functionality of sending email and saving message to queue asynchronously.
Updated code of index.mjs
import { SESClient } from "@aws-sdk/client-ses";
const ses = new SESClient({region : "us-east-1"});
import {emailHelper} from "./helper.mjs";
import {sqsHandler} from "./sqsHelper.mjs";
export const handler = async function (event){
  const {name, email, phoneNum, subject, message } = JSON.parse(event.body);
  const command = await emailHelper(name, email, phoneNum, subject, message);
  const sqsHelper = await sqsHandler(event);
  try {
      let response = await ses.send(command);
      let responsebody = {
      statusCode: response.$metadata.httpStatusCode,
      headers: {
              'Access-Control-Allow-Origin': '*'
          },
      body: sqsHelper.body,
    };
      return responsebody;
  }
    catch (error) {
      console.log(error);
      throw new Error("Something went wrong");
  }
};
Once the code is deployed in the Lambda function and contact form is submitted, two things are achieved.
- An email notification is received.
- Data coming from request body is stored in the queue.
For viewing the stored data in the queue we can click “Poll for messages” button.

Step 2
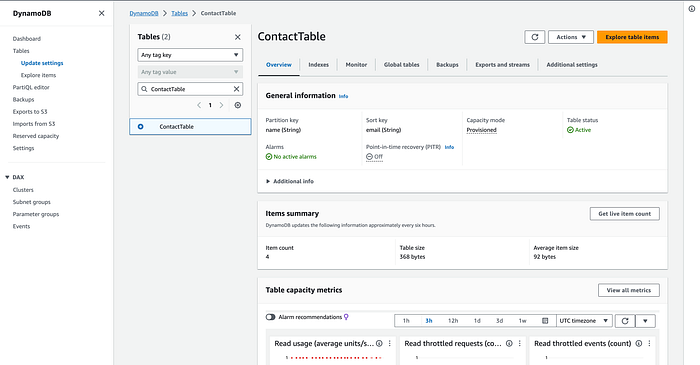
Previously we were just sending emails after the contact form has been filled up without storing the data. Now, we are going to save the data asynchronously in SQS queue and then in database. So, to do this at first we need to create a table in AWS DynamoDB where we will be storing the data coming from SQS.
Step 3
Now to serve data stored in SQS to DynamoDB we need to create a Lambda function with permission policy to access DynamoDB and receive messages from SQS. Also, we need to provide previously created SQS as trigger to the Lambda function.
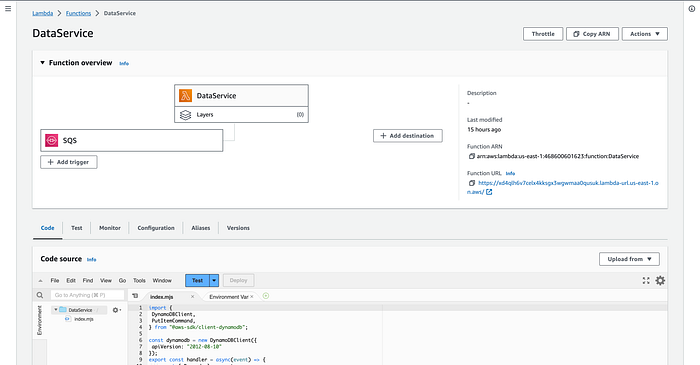

As a second step of Lambda configuration, now we need to write logic in the Code section of Lambda to store data in DynamoDB table.
Demo Code snippet is shown as;
index.mjs
import {
 DynamoDBClient,
 PutItemCommand,
} from "@aws-sdk/client-dynamodb";

const dynamodb = new DynamoDBClient({
 apiVersion: "2012-08-10"
});
export const handler = async(event) => {
    const { Records } = event;
    const body = JSON.parse(Records[0].body);
      const saveParameters = {
      TableName: 'ContactTable',
        Item: {
         "name": {
         S: body.name
         },
         "email": {
         S: body.email
         },
         "subject":{
          S: body.subject
         },
         "message":{
          S: body.message
         },
         "phoneNum": {
         S: body.phoneNum
         }
        }
     };
 const command = new PutItemCommand(saveParameters);
 await dynamodb.send(command);

 const response = {
 statusCode: 200,
 body: 'success'
 };

 return response;
};
After deploying the above code in Lambda function, now we will be able to persist data presented in SQS to DynamoDB.
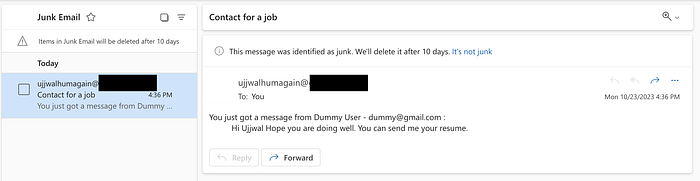
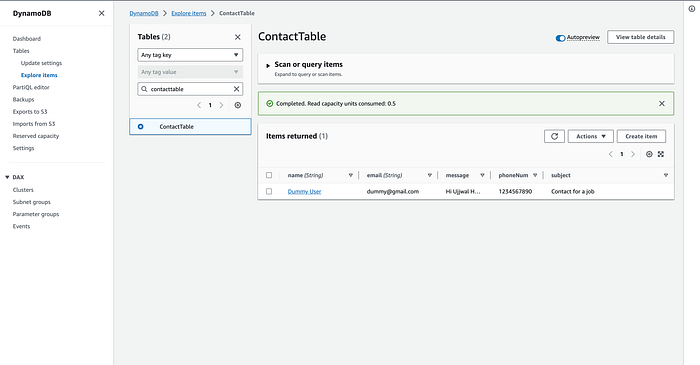
A sample contact form is provided below. For the demonstration purpose I used Postman to send the request where I have provided all the required data via request body.


Once the contact form is filled up and submitted successfully , an email is received in the registered email address with form data that has been sent as a request body. Also, the form data is saved in the database.
The overall workflow of the steps above is presented in a diagram below;
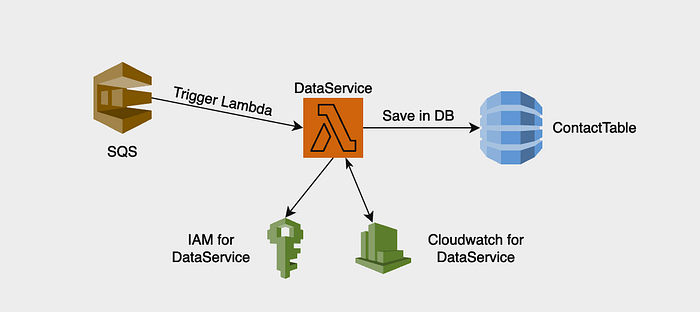
Note: Cloudwatch and IAM role for Lambda is created by default if we choose to create a new role while creating the Lambda.
Finally the required integration of AWS services for making dynamic contact form is done. — If you have not gone through Part I of this integration then go through this link.